|
Nebula uses
TCL as a scene describing langauge, so we'll be working
alot with it from here on to setup our world, animation
sequences and input events (keyboard input).
'Scenegraph'
is a term given to the hierachy of components that make up a
scene. Think of it as a tree-like structure with an origin node
and several 'child' nodes nested one inside the other. Initially
we are going to work with a TCL file shipped with the Nebula
source you downloaded and compiled. This file is called
startup.tcl, and contains enough
basic scene setup information to use as a blank canvas for
building a world. As an alternative to manually writing TCL
files, Nebula provides a console so that we can sketch out our
scenegraph. We are going to work this way at first and then move
to a text editor once we have created a basic scene file.
First
of all, using either a terminal (Linux) or Cygwin (Windows):
|
|
cd
nebula
|
|
Where
'nebula' is the directory you downloaded. Remember Windows users
will probably need to use the drive letter at the beginning: cd
c:/path/to/nebula
Now exectute the script using
the nebula applications nlaunch
or nsh
|
|
nlaunch
doc/tutorial/startup.tcl
or
nsh
-run doc/tutorial/startup.tcl
|
|
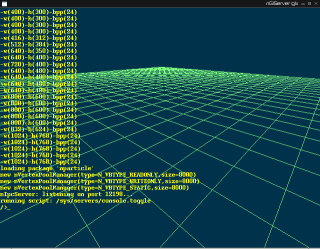
Now
hit the <ESC> key on your keyboard. You should see
something like this. Toggling the <ESC> key activates and
deactivates this console. The console is your interface to
navigating the scenegraph. In a very intuitive way, you can walk
through it using simple commands. Type:
|
|
dir
|
|
The
ouput you see is: sys usr observer
Right
now you are at the 'top' of the scenegraph tree, at the root
node '/'. The three items you see in the output are 'child
nodes' of this root node, each with sub nodes therein.
sys
provides a variety of core services for the world like graphics,
input and time, usr is the root
of all scene data trees and observer
provides a base virtual context for you, the viewer.
In
this way the Nebula scenegraph is a logical, virtual filesystem
of parent and child nodes whose hierachically composed elements
comprise the features, data and events that make up a world.
Secondly, their influence on each other is largely described by
their position in the scenegraph tree.
dir
lists the contents of the current working 'directory'. To move
into a directory type:
|
|
sel
<path to node>
|
|
So, for now:
|
|
sel
/usr/scene
|
|
Now type dir,
you should see nothing at all. It's here, in /usr/scene,
that we will create all the scene specific data for our world.
To start with we are going to create the requisite base
parent node for a Nebula world, and build it up with our data:
|
|
new
n3dnode disc1
|
|
“disc1”
is simply a name given to our n3dnode. You can make up any name
in it's place.
Now move into it
|
|
sel
disc1
|
|
First of all
we are going to be needing some data. Download the following
files and save them in $NEBULA_DIR/data/
with right-click 'Save
As'.
disc1.n3d
disc2.n3d
disc3.n3d
shd.n
tex.bmp
light.tcl
We
now need to create three nodes to contain certain data and state
information for our world..
|
|
new
nmeshnode mesh
new nshadernode shader
new ntexarraynode
texture
|
|
Move into the
meshnode you have just created:
|
|
sel
mesh
|
|
Now we are
ready to import the pre-made model.
|
setfilename data/disc1.n3d
|
|
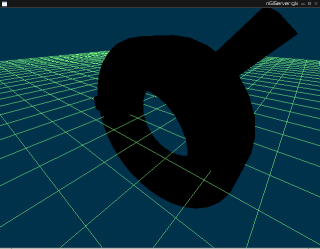
If
done correctly, you
should see a black lump like this. If you get errors, check to
make sure the mesh file you load is actually there and whether
you can access it from where you are on you local
filesystem.
Now we want to move up and out of the
nmeshnode and into the
shadernode for consequent configuration.
|
sel ..
sel shader
|
|
'sel
..' means move up one level (NOTE: the two commands
you just used could have been simplified into one: 'sel
../shader')
'Shaders'
provide control of the properites of surfaces, therefore
directly affecting how objects in the world are drawn to the
screen; the relative scale of a texture, texture animations,
transparency, whether the surface gives off light etc.
Many
engines have a dedicated separate 'shader language'. Nebula
however configures these properties within the TCL scene file,
in the nshadernode. Shader nodes
often contain a lot of information.
Now,
rather than writing all those properties into the console (which
would be prone to buckets of error), we can 'source' an
external, pre-written file.
Inside this shd.n
(simply a text file) are a list of settings pertaining to the
shader.
|
|
source
data/shd.n
|
|
Nothing will
have appear to have changed. The shader has been loaded, but
doesn't have any texture to work with. Move up into the texture
node and load a texture into it:
|
|
sel
../texture
settexture 0 data/tex.bmp none
|
|
The syntax
for settexture is as follows: settexture <texture stage>
<texture> <alpha texture file>.
'texturestage' is
the position this texture holds within a list of textures used
in a texture animation. '0' is stage 1 in the list.
Again
not much has changed. The shader is loaded, and so is the
texture, but because we haven't setup lights for our scene, the
texture receives no light. So lets go to the top level of our
scene-data tree and put in some lights using the same source
technique as with the shader:
|
|
sel
/usr/scene
source data/light.tcl
|
|
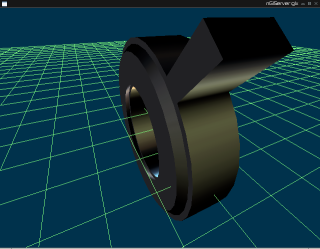
Now
you should have this. To view what you've made press themiddle
mouse button (otherwise known as wheel) and spin the form
around. Zoom in and out by clicking the right mouse button and
dragging.
Now we should save this file so we can re-use
it. While in /usr/scene do the
following:
|
|
.saveas myscene
|
|
This will be
written into the current directory on your filesystem as
myscene.n
A
*.n file is simply a nebula compatible textfile, but it can be
easily renamed to a myscene.tcl for clarity.
This file
can later be sourced into a fresh load of startup.tcl at the
/usr/scene
level using a simple command, so you don't need to write all
that again:
|
|
sel
/usr/scene
source myscene.n
|
|
Now in you
favourite text editor, open up myscene.n
Mine looks like
this.
NOTES:
From the Nebula
Console the command pwd
will show you where you are in your local filesystem. The
command cd
will allow you to change into a new directory.
At any
point you want to see what options are available to a given node
type, just sel
into that node and type getcmds.
|
|
Back to Part
1: Compiling
Go on to Part 3:
Editing
and Animation
|
